Recent Posts and Recent Comments at Sidebar

Feb 21, 2009

Many from bloggers wish insatlling the widget of Recent post and Recent post at sidebar, and for this matter is several blogger creating recent post and recent comment widget by javascript, However i think that is not good for your blog SEO (Search Engine Optimization). Besides not good to SEO, installation javascript risk to slow down your blog loading, so that matter it's can make your visitor don't feel balmy.
To install recent post and recent comments, be in fact you can use your blog feed address. this is the address of Recent Post :


http://YourBlogName.blogspot.com/feeds/posts/default

And this is the address of Recent Comments :

http://YourBlogName.blogspot.com/feeds/comments/default

YourBlogName must be alter with your blog name. For example :

this is my Recent Post address :

http://rohman-freeblogtemplate.blogspot.com/feeds/posts/default

And this is my Recent Comments address :

http://rohman-freeblogtemplate.blogspot.com/feeds/comments/default


Still compused to install this feed adress to your blog. Please follow the steps :

  1. Login to blogger with your ID
  2. After entering the dasboard page , click Layout. Please saw the picture :
    layout

  1. Click at Page Element tab. See the picture below :
  2. Click at Add a Page element.
  3. After emerging pop up window , Klik add to blog button for the things Feed. See the picture following :
  4. feed element

  5. After that, Insert your fedd URL (URL feed post for Recent posts or URL feed comment for recent comments). Example :
  6. feed url

  7. Click Continue button.
  8. Then alter the title with Recent Post for recent post widget or Recent Comments for recent comments widget. Example :
  9. feed url

  10. Click SAVE CHANGES button.
  11. Move that element where you want, and then click SAVE button.
  12. Finish. Please see the result.

Now you have had Recent Posts or Recent Comments widget at your sidebar with good SEO for your blog, and without slow loading. See you at my next post, and if you are new visitor don't forget to subcribe in a reader.
READ MORE - Recent Posts and Recent Comments at Sidebar

Seabreeze 3 coulmn Blogger Theme

READ MORE - Seabreeze 3 coulmn Blogger Theme

Revolution Lifestyle Blogger Theme

READ MORE - Revolution Lifestyle Blogger Theme

Cool 3 Column Blogger Theme

Blogger Theme Download
FEATURES:* Two or Three right side columns which are easy to switch (default is three)
* Three great location ad spots (header banner 468 x 60, three 125 x 125 buttons in sidebar, and a 468 x 60 AdSense banner above the first post)
* Integrated Feedburner rss and subscribe via email sidebar module (also includes “add to favorites” Technorati link)
* Built-in live traffic feed widget from FEEDJIT
* Built-in MyBlogLog and BlogCatalog recent reader widgets
* Dynamic tabs easily created by editing the link list widget
* Search box without the need for a “go” button
* Recent posts and comments widgets
* Nicely designed individual blog post comments section
* Properly setup Blogger layout editor

Download Theme

READ MORE - Cool 3 Column Blogger Theme

How to recover corrupted NTFS data through Knoppix Linux Live CD / D

Recently one of my PC having Windows XP failed to boot. I tried to reinstall the OS. But Windows XP installer gave the error message that C drive having NTFS partition contains undefined File system, and it needs to be formatted. The partition in question contained valuable data, and an alternate way was needed.

I tried to boot with Knoppix 5.1.1 Live CD. It was a breezy success. It showed all the partitions of hard disks on my desktop. When I tried to mount the corrupted partition (C drive in Windows), it asked me to Force mount it since the partition in question had some problem. I said yes, and voila! It worked.

I changed the attribute of other mounted harddisks NTFS partition to read-write mode (right click on partition in question and select read write attribute) and copied all my data to other, safe partition. Knoppix 5.1.1 had built in NTFS partition READ-WRITE capabilities. You can also use USB Key or Burn a CD / DVD to backup data.

After backing up my data, I reformatted the C drive and finally I was able to clean reinstall WindowsXP again.

You can download latest Knoppix Live CD / DVD image for free from HERE

READ MORE - How to recover corrupted NTFS data through Knoppix Linux Live CD / D

How to download and install phonon.dll, phonon4.dll, libphonon.dll – phonon.dll download

Many *nix applications are being now ported to Windows and when you try to run them, they display missing phonon.dll file error messages specially if the program is Multimedia kind.

Here are the files you can download :

phonon.dll

phonon4.dll

libphonon.dll

libphononexperimental.dll

Download these files and copy them in application’s directory. For example, if you are using KDE 4 Windows, then place these files in KDE4’s bin directory – where all KDE4 executables are placed.

You can try placing them in Windows system directory too.

READ MORE - How to download and install phonon.dll, phonon4.dll, libphonon.dll – phonon.dll download

Intel Precessor With Heat Sink

A processor number:
  • Represents a broad set of features that can influence overall computing experience
  • Differentiates the relative features within a processor brand family (e.g. within the Intel® Core™2 processor family or within the Intel® Xeon® processor family)
  • The processor number is not a measurement of performance considered when choosing the right processor for you.
READ MORE - Intel Precessor With Heat Sink

How to copy and open multimedia / youtube swf video files from Opera cache?


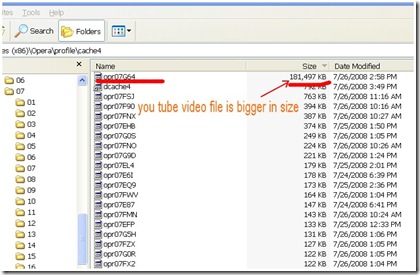
opera cache folder

Opera browser is notorious in making everything cryptic inside its cache. When it stores internet history in its cache, it renames everything to its liking and you are left behind to guess which file belongs to what.

Still, you can use multimedia files renamed by Opera in such cryptic manner. For example, Multimedia / Youtube video files were normally big in size, and you can easily judge them by their size in cache directory. Oprea cache directory normally located at \Program Files\Opera\profile\cache4\. Under this directory you may find hundreds of files with cryptic names generally started with ‘opr’ prefix. Sort them by size and hunt for the file with a particular time stamp – i.e. the time when you were surfing or streaming a particular audia/video. Copy that file to another folder and rename it with extension swf (if Youtub video) or jpg or mp3 as the case may be. Open the file in appropriate program. If you use Mplayer, then you may directly open files of any media you have copied.

READ MORE - How to copy and open multimedia / youtube swf video files from Opera cache?

Edition of The IDF Processor

While the previous edition of the IDF had been particularly rich in terms of ads around the processor and Atom MID (Mobile Internet Device) or Netbooks that accompany it, the vintage of this August reserve a place smaller to this new platform. Anand Chandrasekher, one of the fathers of mobility at Intel.
READ MORE - Edition of The IDF Processor

Intel silicon Processor LCD

As for the future of Atom, the person has of course referred to the new platform Moorestown without giving more details. A Wafer of Moorestown was still exhibited before qu'Anand Chandrasekher gives us an appointment next spring to learn more about this new platform that would enable Intel to bring its solution Atom in mobile phones, if everything is fine.
And since there was definitely nothing to announce, we video was projected to show us a concept phone tactile, largely inspired by the iPhone but animated by an Intel processor and offering functions geolocation or reading code bar. Finally Anand Chandrasekher gave a demonstration of an Intel MID Atom running the famous game World of Warcraft, the MID is connected to an LCD screen.
READ MORE - Intel silicon Processor LCD

How to Dual / Triple boot Windows 7 with Windows XP / Linux

windows 7

Here is no-nonsense quick take to dual / triple boot Windows 7 with Windows XP and Linux.

What you need additionally : Ubuntu Linux Live (or, any Live Linux CD/DVD) CD/DVD. You can download Ubuntu Live Linux CD from here.

Assuming that you are installing Windows 7 on a separate partition in a machine that had Windows XP and Linux installed already.

If your machine had only Windows XP and no Linux, Windows 7 is generous enough to let you choose to boot older version of Windows through its boot manager.

But, it deliberately ignore other non-windows OS and file system, and hence you can’t boot Linux through Windows 7 boot manager.

In such case, you need to restore GRUB boot manager. Follow these steps carefully and restore your old GRUB:

Boot through Ubuntu Linux Live CD/DVD

Start terminal and give following command:

$ sudo grub

You will then enter in grub configuration mode. Here, give following command:

$ root (hd0,0)

Then give following command:

$ setup (hd%1,%2) - here, %1,%2 is the disk volume and partition value of your original Linux installation where /boot/grub is already installed. For example, in my machine, it is on disk 1, partition 6, so the value will be – (hd0,5). So, be careful here else your Grub will not be restored, and you will get error message instead.

Finally, give following command within grub configuration mode:

$ quit

$ exit

Now, reboot (do not forget to remove Linux Live CD/DVD to boot from HDD). If everything had gone right, your Grub boot manager will load and prompt you to choose to boot from either Linux or Windows 7. Enjoy

READ MORE - How to Dual / Triple boot Windows 7 with Windows XP / Linux

How to reduce / lower temperature of AMD processor?

Your AMD laptop is too hot to handle? It is so hot that you can virtually fry a PAPAD with it or prepare a cup of hot coffee over it?

Your AMD PC are getting freezing now and then due to excessive heat?

Come summer season and you face problem like this – especially in Indian sub-continent.

You can cool down your PC / Laptop a little bit with a little utility though.

AMD had since been released a utility called cool-and-calm utility that works with certain AMD processors and certain OS. If you use Windows, try your luck with this download:

http://www.amd.com/us-en/assets/content_type/utilities/AMD_Processor_Driver_1320053.zip

There is another one for Linux too. Search www.amd.com for your version of linux.

Simply unzip and install the above utility. It takes your processor in on-demand mode by reducing its clock speed and hence keep the temperature less by about 5-10 degree Celsius otherwise.

READ MORE - How to reduce / lower temperature of AMD processor?

Nice Picture from AMD

READ MORE - Nice Picture from AMD

AMD's Six Core CPUs are running

Unlike Intel three-dual-core 220 watt monsters, AMD's are real six-core chips with HT3 consuming 95 watts. Intel will play copycat for the next 20 years...

My guess is that the HT3 cache coherence technology may indeed carry some hidden tricks, maybe something borrowed from the Horus chipset.
READ MORE - AMD's Six Core CPUs are running

Intel Processors terminologies Explained

Clock Speed:

A clock speed measures how fast a processor performs an activity.A clock speed is measured in gigahertz (GHz), which means a billion cycles per second.

Core:
Quad-core technology is a single processor chip including four processor cores or rather four simultaneously hard working brains. A

Software developers chop up their code (known as threading) and run each piece concurrently through whatever processor core happens to be most available. Increasingly, software developers rely on Intel® quad-core and dual-core technology so their multithreaded program can do more things simultaneously producing faster, more efficient results for you.

Tip: for exceptional multitasking, look for Intel® dual-core processors. If you’re a mega-multitasker, gaming elitist, or multimedia maven, look for Intel quad-core processors.

Imagine the RAM of your computer as one city, and the CPU as another. Between them is a wide road (the Front Side Bus). When you’re making calculations, developing graphics - anything you and your software demands - the Front Side Bus transfers data quickly to meet that demand.

Tip: whatever system you choose, make sure the components work together. For example, if you’re building a media computer, having a 1333 MHz front side bus that can handle HD video is wonderful - but make sure the CPU is adequate for the challenge.

Imagine arriving at your local shop and having all your favourite food fly off the shelves and fill the shopping trolley in minutes.

That’s L2 cache. It remembers the information you access most frequently in your computer so you can easily get to it without those annoying lags. (Just don’t expect it to remember documents you didn’t save.)

Tip: more L2 cache reduces bottlenecks and helps speed memory performance.
Enhanced wireless connectivity is your mobility life saver: experience less dead spots and more hot spots.

But optional Intel® Next-Gen Wireless-N is more than enhanced wireless connectivity¹. It’s a performance boost. Next-Gen Wireless-N manages available bandwidth; If there is more than one channel, twice the data can be sent, up to twice as fast.

Tip! Ask for Intel® Next-Gen Wireless-N technology in your notebook purchase if you want a faster connection where 802.11n networks are available.

¹ Intel® Next-Gen Wireless-N technology and Connect with Intel® Centrino® processor technology certified wireless N access point. Wireless N access points without the Connect with Intel Centrino technology processor identifier may require additional firmware for increased performance results. Check with your PC and access point manufacturer for details.

Requires Intel® Next-Gen Wireless-N technology and Connect with Intel® Centrino® processor technology certified wireless N access point. Wireless N access points without the Connect with Intel Centrino technology processor identifier may require additional firmware for increased performance results. Check with your PC and access point manufacturer for details.

READ MORE - Intel Processors terminologies Explained

Latest Intel Desktop Processors Features

Extreme Gaming with the Intel® Core™ i7 Processor Extreme Edition

The Intel® Core™ i7 processor Extreme Edition with intelligent multi-core technology.It delivers breakthrough performance in gaming. Plus, multitask demanding applications up to 25% faster and unleash amazing power for digital media.

Features:

  • Clock Speed 3.2 Ghz
  • Cores/Threads 4/8
  • Turbo Boost Up to 3.46 Ghz Boost
  • Intel® Smart Cache 8 Mb
Intel® Core™ i7 Processor

Best for the heaviest workloads. Intel® Core™ i7 processor, the best desktop processor on the planet. Built on advanced technology that automatically applies processing power where it’s needed most, the Intel Core i7 processor’s incredible speed and efficiency lets you multitask 25% faster and delivers an amazing multimedia creation experience.

Features:

  • Clock Speed up to 2.93 Ghz
  • Cores/Threads 4/8
  • Turbo Boost Up to 3.46 Ghz Boost
  • Intel® Smart Cache 8 Mb

Intel® Core™2 Quad Processor
Get the performance you need to handle the hottest digital media, content-creation software, and immersive multi-threaded games. Four cores provide all the power you need to achieve smooth effects during game play, plus the capacity to handle today’s processor-hungry multimedia applications.

Features:

  • Clock Speed up to 2.83 Ghz
  • Cores/Threads 4
  • FSB(Front Bus Speed) Up to 1333 Mhz
  • L2 Cache 4 Mb

Intel® Core™2 Duo Processor
Enter the performance-packed and energy-efficient world of HD entertainment.Get amazing responsiveness for gaming or running complex applications with the Intel® Core™2 Duo processor. Load large files faster and run multiple applications simultaneously—all while enjoying your entertainment without lag time.

Features:

  • Clock Speed up to 3.16 Ghz
  • Cores/Threads 2
  • FSB(Front Bus Speed) Up to 1333 Mhz
  • L2 Cache 6 Mb
READ MORE - Latest Intel Desktop Processors Features

Difference between 32-bit and 64-bit Operating System

  • The terms 32-bit and 64-bit refer to the way a computer’s processor (also called a CPU), handles information.
  • The 64-bit versions of Windows can utilize more memory than 32-bit versions of Windows.
  • By using 32 bits your processor can represent numbers from 0 to 4,294,967,295 while a 64-bit machine can represent numbers from 0 to 18,446,744,073,709,551,615.
  • 64 bit minimize the time spent swapping processes in and out of memory by storing more of those processes in Random access memory (RAM) rather than on the hard disk.
  • 64bit can increase overall program performance
  • 64 bit benefit to academic institutions and private companies, where large calculations are being performed, huge databases are being accessed, and complex problems are being solved.
  • A 64-bit processor is made with more advanced silicon processes, have more transistors, and faster speeds.
  • In 64 bit you need 4 GB of RAM to take full advantage of the capabilities
  • There is another problem when you run 32-bit software programs in the environment of a 64-bit operating system. Many programs won’t work properly, such as Adobe Acrobat and Windows Media Player

64-bit

READ MORE - Difference between 32-bit and 64-bit Operating System

Intel Multi-Core Technology Features

  • multicore
  • It Incorporates multiple processor execution cores in a single package in order to deliver full parallel execution of multiple software threads
  • It put multiple execution cores into a single processor as well as continuing to increase clock frequency
  • By incorporating multiple cores, each core is able to run at a lower frequency, dividing among them the power normally given to a single core. The result is a big performance increase over a single core processor.
  • Continuous advances in silicon process technology from 65 nm to 45 nm and to 32 nm) to increase transistor density.
  • Minimizes latency and improves efficiency and speed.
READ MORE - Intel Multi-Core Technology Features

Intel’s 32nm Process Technology

  • Intel introduces 32nm process technology with second generation high-k + metal gate transistors. This process technology builds upon the tremendously successful 45nm process technology that enabled the launch of the Intel® microarchitecture codename Nehalem and the Intel® Core™ i7 processor.

READ MORE - Intel’s 32nm Process Technology

General keyboard shortcuts

CTRL+C Copy.
CTRL+X Cut.
CTRL+V Paste.
CTRL+Z Undo.
DELETE Delete.
SHIFT+DELETE Delete selected item permanently without placing the item in the Recycle Bin.
CTRL while dragging an item Copy selected item.
CTRL+SHIFT while dragging an item Create shortcut to selected item.
F2 Rename selected item.
CTRL+RIGHT ARROW Move the insertion point to the beginning of the next word.
CTRL+LEFT ARROW Move the insertion point to the beginning of the previous word.
CTRL+DOWN ARROW Move the insertion point to the beginning of the next paragraph.
CTRL+UP ARROW Move the insertion point to the beginning of the previous paragraph.
CTRL+SHIFT with any of the arrow keys Highlight a block of text.
SHIFT with any of the arrow keys Select more than one item in a window or on the desktop, or select text within a document.
CTRL+A Select all.
F3 Search for a file or folder.
ALT+ENTER View properties for the selected item.
ALT+F4 Close the active item, or quit the active program.
ALT+Enter Displays the properties of the selected object.
ALT+SPACEBAR Opens the shortcut menu for the active window.
CTRL+F4 Close the active document in programs that allow you to have multiple documents open simultaneously.
ALT+TAB Switch between open items.
ALT+ESC Cycle through items in the order they were opened.
F6 Cycle through screen elements in a window or on the desktop.
F4 Display the Address bar list in My Computer or Windows Explorer.
SHIFT+F10 Display the shortcut menu for the selected item.
ALT+SPACEBAR Display the System menu for the active window.
CTRL+ESC Display the Start menu.
ALT+Underlined letter in a menu name Display the corresponding menu.
Underlined letter in a command name on an open menu Carry out the corresponding command.
F10 Activate the menu bar in the active program.
RIGHT ARROW Open the next menu to the right, or open a submenu.
LEFT ARROW Open the next menu to the left, or close a submenu.
F5 Refresh the active window.
BACKSPACE View the folder one level up in My Computer or Windows Explorer.
ESC Cancel the current task.
SHIFT when you insert a CD into the CD-ROM drive Prevent the CD from automatically playing.
READ MORE - General keyboard shortcuts

Windows Service Recommened Settings

Event Log
It’s best to leave this one on Automatic.

Protected Storage
Leave this set to Automatic, as setting it to Manual can cause a delay at startup of 1 to 2 minutes. It also has the odd side effect of causing property pages in the Services tab not to appear.

Net Logon

if you do need to logon to a domain or LAN, you need to keep this on Automatic.

Alerter

A home user can set this to Manual.

Computer Browser
A home user can set this to Manual.

Distributed Link Tracking Client
This sends notifications of files moving between NTFS volumes in a network domain. A home user can set this to Manual.

Distributed Transaction Coordinator
A home user can set this to Manual.

Fax Service
If you are not using Modems with Fax capabilities, you should set this to Manual.

Indexing Service
A home user can set this to Manual.

Internet Connection Sharing
If you are sharing an Internet connection on a small home network, then set this to Automatic. If not, set this to Manual.

IPSEC Policy Agent
This manages IP security. A home user can set this to Manual.

Messenger
Messenger sends and receives messages transmitted by administrators or by the Alerter service. A home user can set this to Manual.

NT LM Security Support Provider
This provides security to Remote Procedure Call programs that use transports other than named pipes. A home user can set this to Manual.

Performance Logs & Alerts
This configures performance logs and alerts. A home user can set this to Manual.

Print Spooler
If you don’t have a printer installed (network or local), you can set this to Manual. Remember to change it back to Automatic if you ever do install a printer.

QoS RSVP
This feature provides network signaling and local traffic control setup functionality for QoS-aware programs & control applets. A home user can set this to Manual.

Remote Registry Service
Allows remote registry manipulation. You should set this to Disable.

Routing & Remote Access
This offers routing services to businesses in local area and wide area network environments. A home user can set this to Manual.

RunAs Service
This enables starting processes under alternate user IDs. A home user can set this to Manual.

Security Accounts Manager
This stores security information for local user accounts. Unless you have changed some security policies via the Local Security Policy editor, you can set this to Manual.

Smart Card and Smart Card Helper
A home user can set these to Manual.

TCP/IP NetBIOS Helper Service
This service enables NetBIOS name resolution. A home user can set this to Manual.

Telnet
A home user can Disable it altogether.

DNS client
A home user can usually set this to manual, as it’s used for when you use a DNS server on your network (i.e., not the Internet or dial up connections). If you have name resolution problems afterwards, put this one back to Automatic.

Server Service
This Provides RPC support and file, printer and name pipe sharing. You can set this to manual, unless you are running IIS or using offline files (or similar features), which is not that likely for a home desktop user.

Workstation Service
You should be able to set this to Manual unless you use Alerter or Messenger, in which case set this to Automatic. Otherwise. you should be able to safely set this to Manual instead.

WMDM PMSP Service
I suggest it’s set to manual. If you have any problems with Media Player, set it back to Automatic.

READ MORE - Windows Service Recommened Settings

How to uninstall application using Windows Instrumentation command-line interface (WMIC) instead GUI

By using the Windows Instrumentation command-line interface (WMIC), you can easily uninstall an application without having to use the GUI. Once you become familiar with the steps, it will be much faster than having to access the Add/Remove Programs applet in the Control Panel.

1. Open a command prompt.
2. Input WMIC and press Return. You will see a prompt that looks like this:
wmic:root\cli>
3. At the new prompt, execute the following command:
product get name
This will generate a list of installed applications.
4. At the prompt, execute the following command:
product where name=”" call uninstall
where application name is the name of the program you wish to uninstall (use the exact name provided by the previously generated list).
For example, if I were wanting to uninstall Adobe Reader 9, my command would look like this:
product where name=”Adobe Reader 9″ call uninstall
5. When prompted, input y to confirm that you wish to uninstall the application and press Return.
The application will be uninstalled.

Supporting Operationg Systems:Windows XP Professional, Windows Vista, Windows Server 2003 and Windows Server 2008.


READ MORE - How to uninstall application using Windows Instrumentation command-line interface (WMIC) instead GUI


free counters 
HTML Hit Counter