Block viruses from entering your USB drive

Jul 28, 2009

USB drives are the most popular virus carriers these days. Here is the simple yet powerful command prompt trick with which you can create a dummy file that can block any incoming virus to your Pen drive.

1. Note down the free space in bytes left in your USB drive. To do that, just right-click with your mouse on your USB drive and select properties where you can find the Used space and free space shown in bytes.

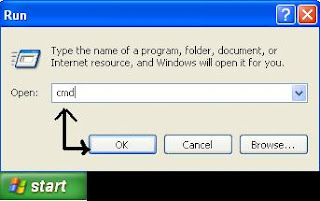
2. Go to start-->Run... and type
cmd and click Ok to open the command prompt(DOS) window.

3. At the command prompt type the command having the syntax as follows:

fsutil file createnew [USB drive path\filename] [free space in bytes]

for example, if the drive letter for your USB drive is 'K', the free space available is 1528864758 bytes and filename you want to use is dummyfile then the command you have to type is:

fsutil file createnew k:\dummyfile 1528864768

As soon as you press ENTER after giving this command a file will be created in you USB drive occupying all the free space available.

Now your USB drive cannot accommodate any incoming viruses as it has zero free space. You can check that from your drive properties. As you can see in the image below the free space left is zero as we have created a dummy file with all the free space available in the step above.
And whenever you want to copy files to your USB drive from secured sources, just delete that dummyfile created and copy the data you wanted and again create a dummyfile that occupies the remaining free space.

This command prompt trick is the best preventive measure to block any virus form entering your USB drive.

READ MORE - Block viruses from entering your USB drive

Email Bankruptcy-The Dark Side of Your Inbox

There are various new innovations designed to make our lives easier but electronic mail has become a new hurdle for most of the people. The Inbox of our email account contains various personal as well as professional communications which sometimes may contain important and time-sensitive information. While most of people are submerged under piles of emails, others find relief through process called email bankruptcy.

Email bankruptcy means clearing out an entire email account which has become unmanageable and starting it all over again. It is similar to financial bankruptcy that involves writing off all the losses and stating all over again.
Starting afresh has big risks as we are losing all the important messages and useful data. Email bankruptcy seems like an extreme action to be taken but it also is a freeing experience from the accumulating stacks of email.

While declaring email bankruptcy, the first step would be to gather all the email address from your existing email folder and save it into the Bcc field addressed to you. The next step would be to select numerous emails to move them into trash and clear off your inbox. Usually a message is sent to all the people explaining the problem and informing the closing of the email account. The faster but less thoughtful option is to merely delete all the old messages and start over like nothing ever happened.

The best way to avoid email bankruptcy is by keeping up with your emails. If you are overwhelmed by increasing number of email in your inbox, make sure you first reply to the most important messages. People may consider shifting older emails to a different file for storage as an alternative to primary inbox folder but this may have the same effect as an email bankruptcy without completely eradicating older emails.
READ MORE - Email Bankruptcy-The Dark Side of Your Inbox

How to Delete Undeletable Files in Windows

It happens quite often that you want to delete a non-required file and it does not get deleted by normal method. When you try removing it by the normal delete method a message saying 'Error Deleting File or Folder' pops out saying that it cannot delete the file as the file is already in use. In such case you need to make sure that the file is not being used by some other program or it is not write protected.
The other variants of this error message include:

Cannot delete file: Access is denied
There has been a sharing violation.
The source or destination file may be in use.
The file is in use by another program or user.
Make sure the disk is not full or write-protected and that the file is not currently in use.

If your are certain that the file is not write protected then here is the how you can safely delete the file:


1. Go to Start-->Run... and type CMD (or) COMMAND and press OK which open the command prompt window. Leave it open and make sure you close all other running applications.

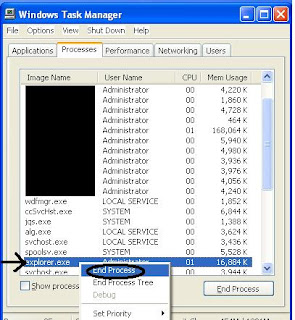
2. Go to Run dialog box again and type TASKMGR.EXE and press OK to access the task manager. (alternatively you can also use the keyboard shortcut Ctrl+Alt+Del to go to task manager)
Now go to Processes tab and End Process named 'explorer.exe' by right clicking on it and choosing End Process.

3. Shuffle back to Command prompt without closing the task manager window. (Use Keyboard shortcut Alt+Tab). Now using DEL command, delete the file.

Syntax:
--> At the command prompt if you are in the same directory as of the file you wanted to delete, just give the following command at the command prompt

DEL (filename).(extension)

--> And if you are in the other directory, you have to specify the entire path of the file to delete it.

DEL (path of the file)\(filename).(extension)

For example, if you want to delete a file named 'movie.flv' in your G: drive, and at the command prompt you are in the C: drive then the syntax to delete the file is

DEL G:\movie.flv

4. Now, use Alt+Tab to go back to Task Manager and from the file menu choose New Task(Run...) and type explorer.exe and click OK in order to restart your Windows shell.That's it!! You have successfully removed the unwanted file from your PC.

If you find the above method of deleting the file a bit difficult, then you have to use an amazing software called 'Unlocker' which can easily kill the processes that are using the file and unlock the file so that you can easily delete or edit it.
READ MORE - How to Delete Undeletable Files in Windows

How To Disable IP Source Routing in Windows

IP source routing is a mechanism that allows the sender to specify the path or route in a network which the network traffic should take to reach the destination.

It is completely legitimate if you use this IP source routing mechanism to discover the TCP/IP addresses of routers within a network. However, a malicious user can use source routing to learn more about a network and target it for an attack. With the IP Source Routing data hijacked, the attackers host can use the information to easily masquerade as a trusted host or client due to which disabling IP Source routing is considered as a common security measure.

Now, let's dive into the actual process of How To Disable IP Source Routing in Windows.


1. Go to Start-->Run... and type regedit or regedt32.exe and click OK.run command to open windows registryThis opens the Registry Editor window

2. From the left pane of the Registry Editor navigate to the System key
HKEY_LOCAL_MACHINE\SYSTEM\CurrentControlSet\Services\Tcpip\Parameters

Disable Source Routing edit registry DWORD Value3. Now create a new DWORD value with the Value name 'DisableIPSourceRouting' and set its value data to 2 which disables the source routing completely (recommended for best security).

The other variants of the value data are:
0 - enables source routing
1 - disables source routing when IP forwarding is also enabled

4. Close the Registry editor and Restart Windows.

That's it!! You have successfully modified the system registry settings to disable the IP Source Routing.

Hope this helps...
Try it yourself and post in your comments.
READ MORE - How To Disable IP Source Routing in Windows

Sony Vaio VGC-JS35GJ Notebook PC

Sony computers have recently launched a new computer in their JS series - 'The Sony Vaio JS35GJ' which is loaded with amazing high technology features and provides you with an advanced computing environment. The computer comes with a brilliant LCD display screen of 20.1 inches by which you can get tuned into some great multimedia entertainment. The wide screen comes with an excellent resolution of 1680 x 1050 (WSXGA+). The sleek Glossary black finish gives the Sony Vaio JS35GJ a rich and stylish looks.


Sony Vaio JS35GJ comes with a high performance Windows Vista Operating system of 64-bit for enhanced computing environment and high graphic support. This fully fledged machine uses the latest technology Intel Core 2 Duo Processor E7000 (2.80) for providing you with some outstanding performance and a secure platform for execution of various applications. The Sony Vaio JS35GJ uses Intel P43 Chipset for faster smoother interface and comes with a Process system Bus of 1066 Mhz and 3 MB Cache memory.The main memory of Sony Vaio JS35GJ comprises of 4 GB RAM of type DDR2 which are attached in the two SO-DIMM slots. The computer facilitates a large storage capacity of 500 GB for data storage with hard disk speed of 7200 rpm.

Sony Vaio JS35GJ is loaded with some other useful features like
  • NVIDIA GeForce 9300M Graphic Card or running high end graphic applications
  • 5 USB 2.0 slots
  • Memory Card slot for connecting your memory card directly
  • Wi-Fi for fast and secure wireless internet
  • 1.3 MP Frontal Camera and microphone for easy video and audio chatting
  • 8.5 kg of weight (of main unit)

Sony Vaio JS35GJ computer is available at MRP of 74,990 INR.

READ MORE - Sony Vaio VGC-JS35GJ Notebook PC


free counters 
HTML Hit Counter